Available for plans: Growth, Performance Module add on
Keka’s Goal module enables companies, departments and individuals to record, measure and align their goals. This comprehensive guide will help you in creating goals and sub-goals and will give you a detailed walk through of the feature.
TABLE OF CONTENTS
- How to create a goal?
- How to create a goal along with Sub-goal?
- How to create a goal using a template?
- How to create a quick goal?
- How to create a quick sub-goal?
- How to create a quick task?
- Automatic status update on goals & sub goals based on progress
Goal can be created from multiple places:
Employees can add their goals from Me > Performance > Goals
Managers will have an option to create goal and assign to their team from My Team > Performance > Team Goals.
Based on a user role and if it is Global Admin/Performance Admin they will have all the options to create goal and assign to their team from Performance > Goals > Administration
Difference between Goals and Sub-goals
- Goals are what an organization, team, or individual wants to accomplish, and are typically quantitative and time-bound. e.g.,”Increase website traffic by 20%”
- Sub-goal is the breakup of the larger goal into smaller, trackable goals/steps that help in tracking progress & achieving the larger goal. e.g.,”Improve organic search traffic by 25%”
Let’s understand how to create Goals and Sub-goals.
How to create a goal?
Go to Me (1) from the left navigation pane on your Keka HR Portal. Select the Performance (2) tab and go to
the Goals(3) tab. To create goal, go to the My Goals tab, and then click on + Add Goals.

On the Add Goal window, you can add the various details pertaining to the goal you’re adding.
Here are the major fields to fill in goal detail.
Goal name (What do you want to achieve?): The title should be short summary of your goal.
Description: The optional description adds a little more detail to your goal. You can describe the details of the goals here.
Tags: Tags help you to group similar goals under a common label. For example, learning (Tag) - you can group all goals related to learning in this tag.
Metric type: To effectively utilize Keka's enhanced goal measurement options, it's essential to understand the best use cases for each metric type:
- Percentage: Ideal for goals with a clear progression from a start to an end value. Example: Increasing customer satisfaction from 80% to 90%.
- Number (Increase from/Decrease from): Suitable for goals requiring numeric achievement or reduction. Example: Reducing support ticket resolution time from 48 hours to 24 hours.
- Completed/Not Completed: Use this for binary outcomes where the goal is either achieved or not. Example: Implementing a new HR policy.
- Reach: Best for targets starting at zero with a specific achievement goal. Example: Conducting 5 internal surveys to reach a broader employee feedback.
- Stay Above: Applies when maintaining performance above a certain threshold is desired. Example: Keeping customer retention rates above 90%.
- Stay Below: Useful for goals where values must not exceed a target, indicating efficiency or cost-control. Example: Keeping quarterly expenses below a predefined budget.
Choosing the right metric depends on the goal's nature, the desired outcome, and the measurement's clarity. Each option provides a structured approach to tracking progress, ensuring goals are not only set but effectively monitored and achieved.

- Progress will be calculated on: When you have a goal with multiple sub-goals, progress can be calculated in two different ways: Average of Sub-Goals or Sum of Sub-Goals.
- Average of Sub-goals: Calculates the progress of a parent goal by taking the average progress of all it's sub goals. For example: If your main goal is to improve customer satisfaction and you have three sub-goals (improve response time, increase product quality, and enhance customer support), the Average of Sub-Goals method calculates progress based on their average progress.
- Sum of Sub-goals: Calculates the progress of a parent goal by summing up the numerical progress values of all it's sub-goals. For example: With a parent goal to "Increase Revenue" and sub-goals for new customer acquisitions (progress: 50), expanding existing accounts (progress: 30), and improving upselling (progress: 20), the Sum of Child Goals method calculates the parent goal's progress as 100
- Goal type:The options that appear in this section may vary depending on Goals settings. There are 3 types of goals. There are three type of goal type Individual, Department and Company.
- Individual - Personal goals pursued by a single person, focusing on individual growth and achievements.
- Department - Collective goals aimed at driving progress and success within a specific department.
- Company - Organizational goals that emphasize the strategic priorities and overall direction of the company.
- Time Frame: The Time Frame option allows you to set a specific period within which you aim to achieve your objective. e.g., "Q2 2023"
- Start date - End date: By default the selected Time Frame Start and End date will be selected. However you have an option to customize the exact dates for when your goal starts and ends.
- Include in review: You can use this check box to include or exclude this goal from regular performance reviews.
Once you have entered the necessary details, click on Publish.

How to create a goal along with Sub-goal?
Go to Me (1) from the left navigation pane on your Keka HR Portal. Select the Performance (2) tab and go to the Goals(3) tab. To create goal, go to the My Goals tab, and then click on + Add Goals.

On the Add Goal window, you can add the various details pertaining to the goal. You can refer to the content above major fields to fill in goal detail.
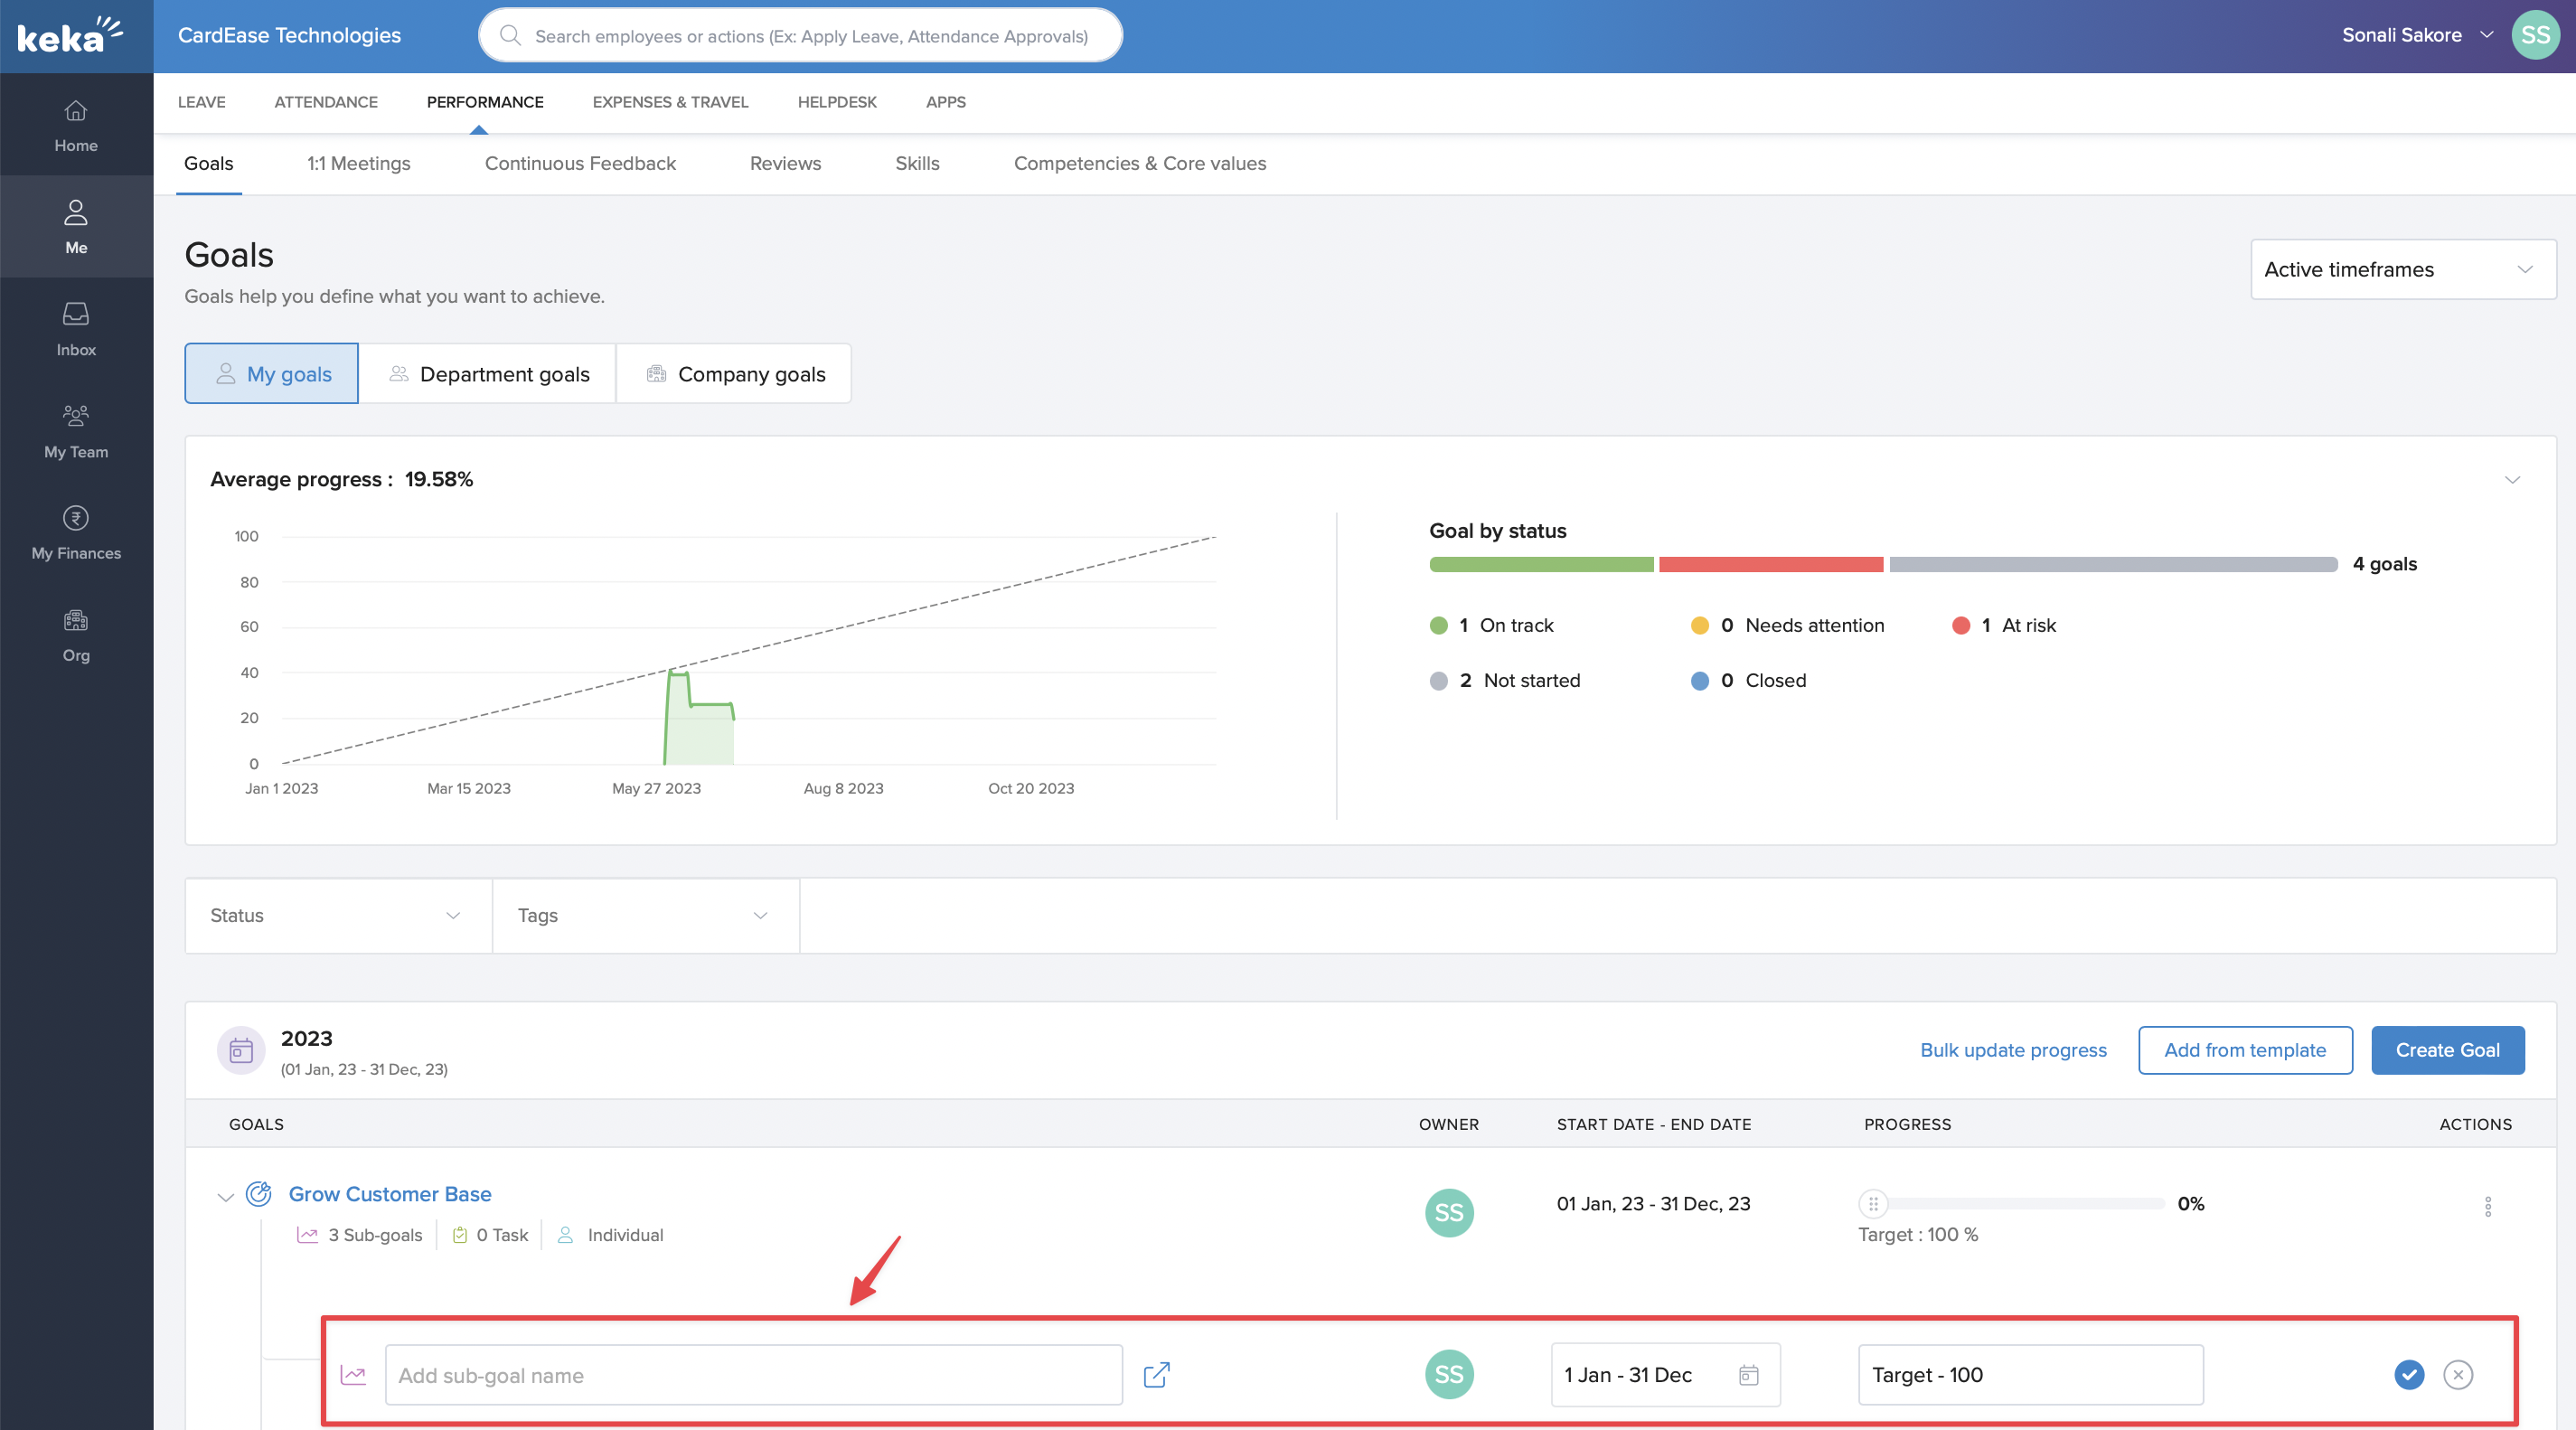
- To create sub-goal. click on + Add Sub-goal.
- On the Add Goal window, you can add the various details pertaining to both the goal and the sub-goal you’re adding.
Here are the major fields to fill to fill.
- Add Goal details - You can refer to the content above major fields to fill in goal detail.
- Sub-goal name (What specific result are you aiming to achieve?): You can define the sub-goal title as the particular outcome you are targeting to help you reach the goal you have set.
- Tags: Tags help you to group similar goals under a common label. For example, learning (Tag) - you can group all goals related to learning in this tag.
- Metric type: You can select from the three type of metric type Percentage, Completed/Not Completed and User Defined.
- Start date - End date: By default the selected Time Frame Start and End date will be selected. However you have an option to customize the exact dates for when your sub-goal starts and ends.
3. Once you have entered the necessary details, click on Publish.

How to create a goal using a template?
- Go to Me (1) from the left navigation pane on your Keka HR Portal. Select the Performance (2) tab and go to the Goals(3) tab.
- To create goal using template, you can go to My Goals tab, and then click on + Add Goals or you can can click on Add from templates.
- Click on choose template
On choose template there are are two options either to select the custom template defined for employees who are part of their organization or you can choose from sample keka template.

4. Click on Add button to add the selected template.
5. Once the template has been added you can modify the selected the selected template details.
6. Once you have confirmed the necessary details, click on Publish.

How to create a quick goal?


- Go to Me (1) from the left navigation pane on your Keka HR Portal. Select the Performance (2) tab and go to the Goals(3) tab.
- To create goal, go to the My Goals tab, and then click on + Add Goals.
- Here are the major fields to fill to fill.
- Goal name:The title should be short summary of your goal.
- More detail: You can use this option to open the detailed goal filling form.
- Start date - End date: By default the selected Time Frame Start and End date will be selected. However you have an option to customize the exact dates for when your goal starts and ends.
- Metric type: By default percentage will be selected. However you can select & change from the three type of metric type Percentage, Completed/Not Completed and User Defined. - Once you have entered the necessary details, you click on Save icon to publish the Goal.
How to create a quick sub-goal?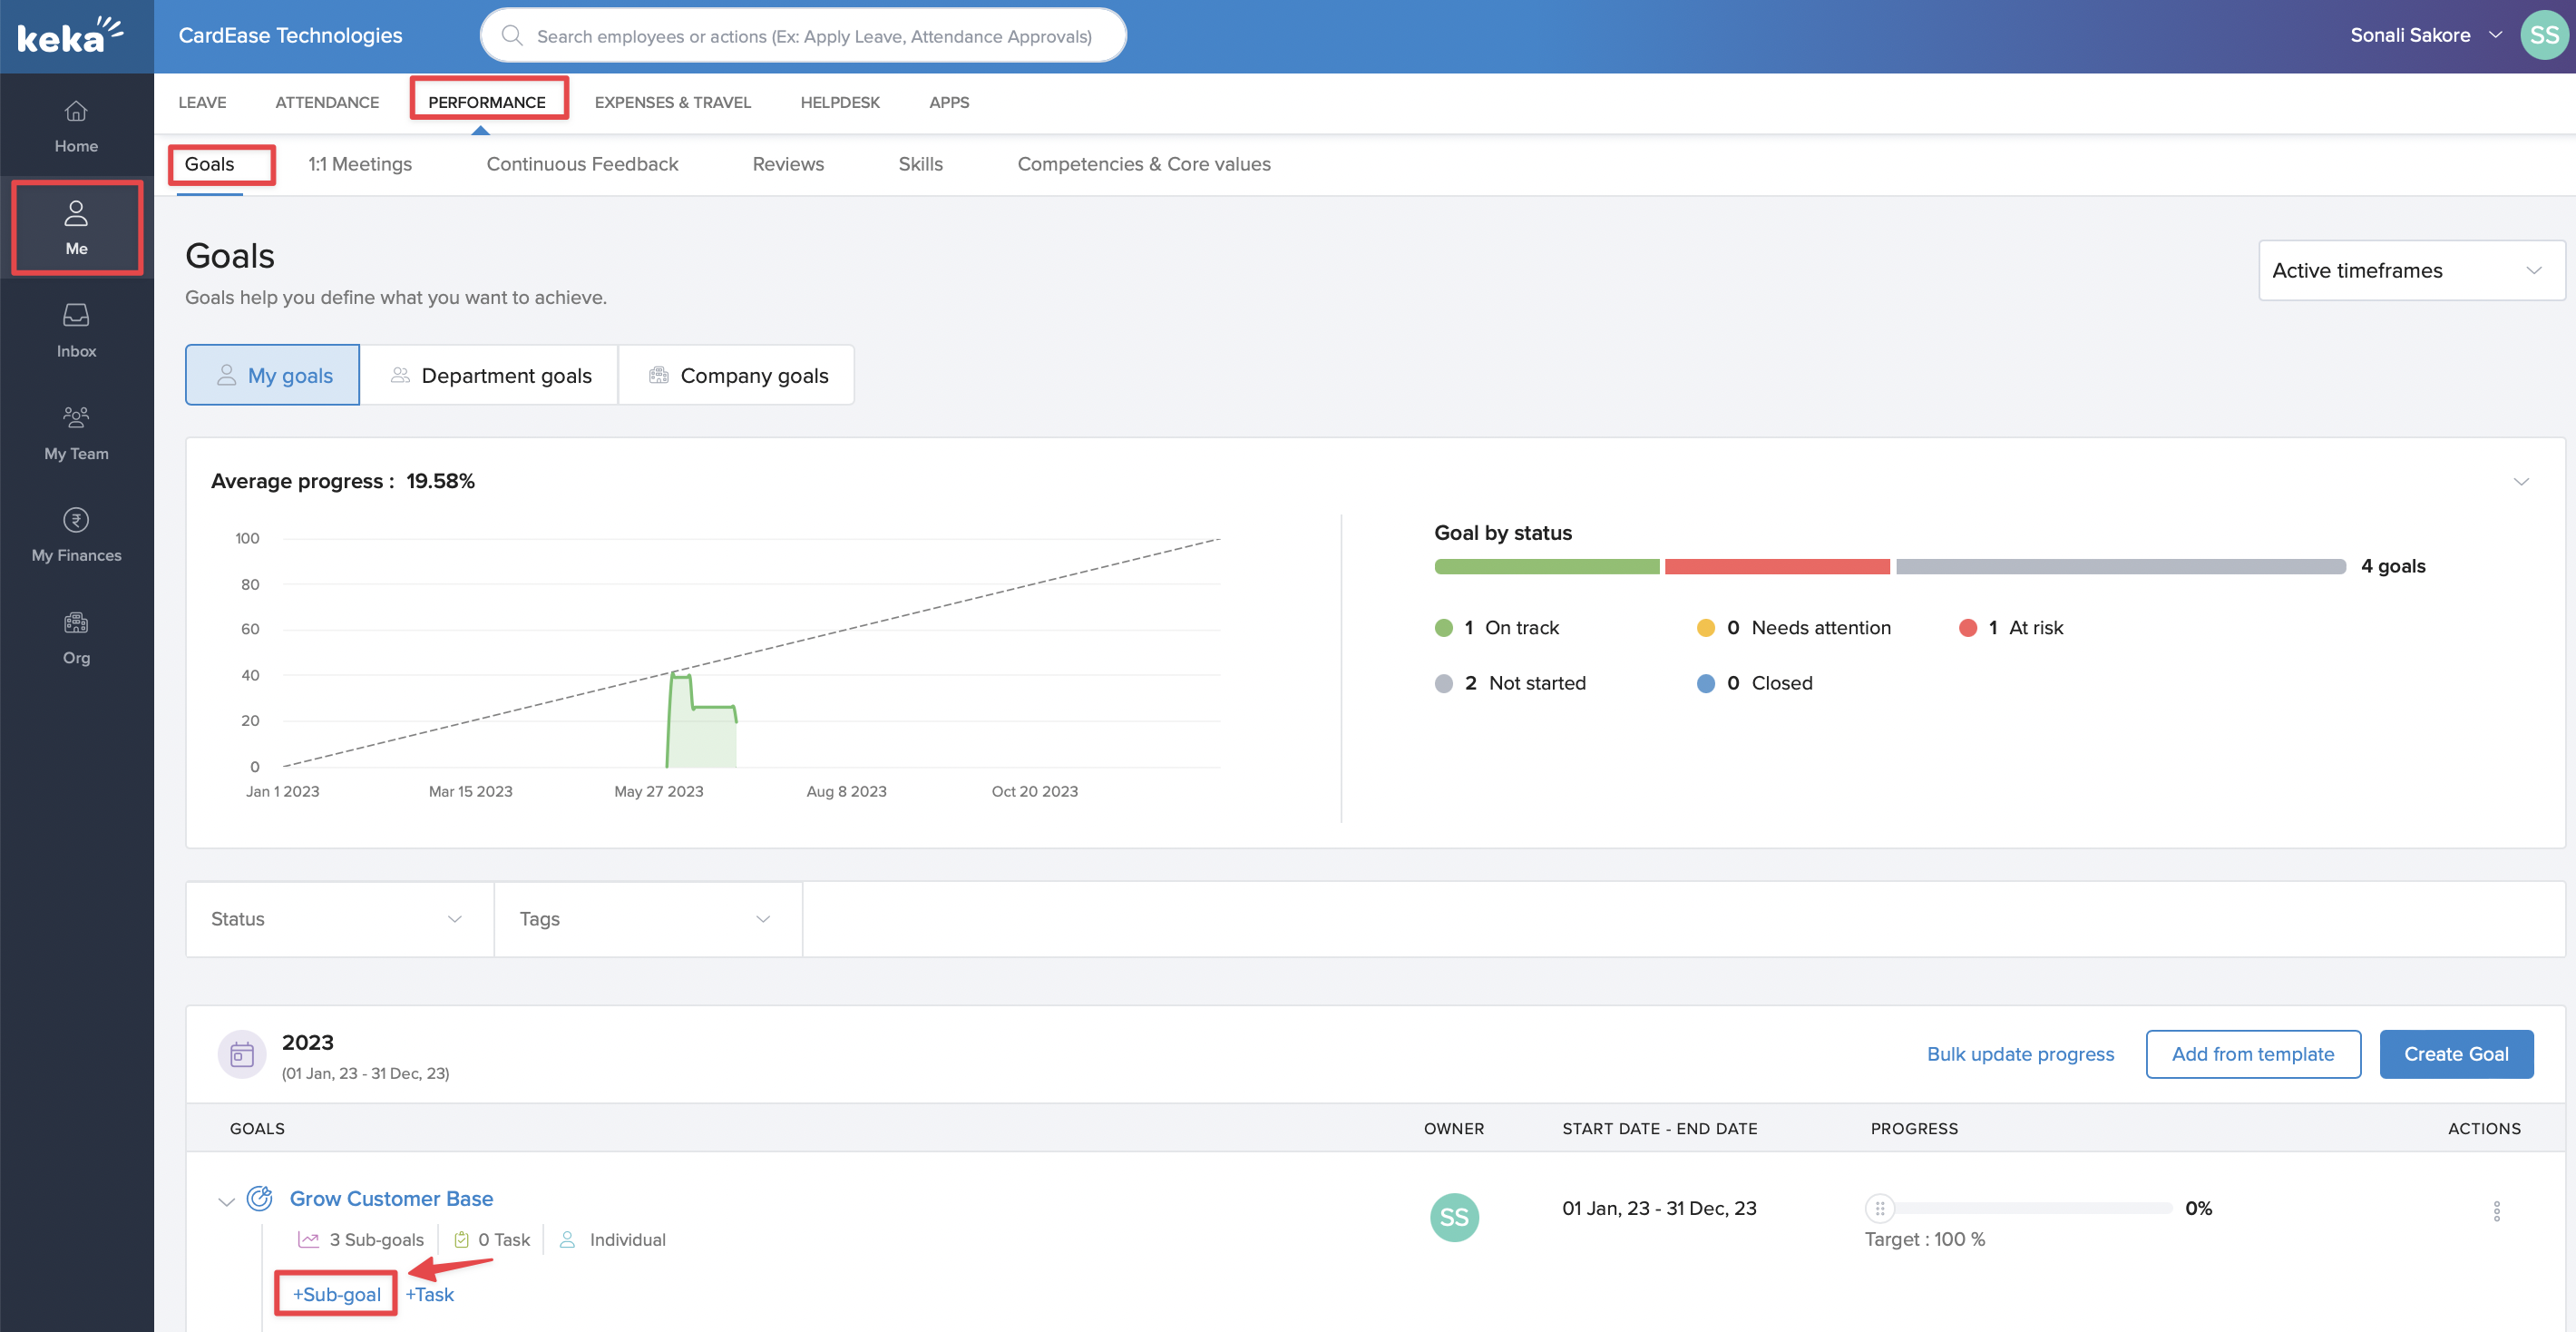
- Go to Me (1) from the left navigation pane on your Keka HR Portal. Select the Performance (2) tab and go to the Goals(3) tab.
- To create goal, go to the My Goals tab, and then select the goals for which Sub-goals to be added then click on + Sub-goal.
- Here are the major fields to fill to fill.
- Sub-goal name: You can define the sub-goal title as the particular outcome you are targeting to help you reach the goal you have set.
- More detail: You can use this option to open the detailed Sub-goal filling form.
- Start date - End date: By default the selected Time Frame Start and End date will be selected. However you have an option to customize the exact dates for when your sub-goal starts and ends.
- Metric type: By default percentage will be selected. However you can select & change from the three type of metric type Percentage, Completed/Not Completed and User Defined. - Once you have entered the necessary details, you click on Save icon to publish the Sub-goal.
How to create a quick task?
In Keka, tasks serve as personal milestones for managers and employees alike, facilitating the journey towards achieving broader goals or subgoals. These tasks are self-set markers that can be customized with names, due dates, and attached descriptions for clarity. They are independent contributors that don't affect the progress of the associated goal, but act as stepping stones, ensuring every individual's actions are aligned with the ultimate objectives of their role and team


- Go to Me (1) from the left navigation pane on your Keka HR Portal. Select the Performance (2) tab and go to the Goals(3) tab.
- To create goal, go to the My Goals tab, and then select the goals for which Sub-goals to be added then click on + Task.
- Here are the major fields to fill to fill.
- Task name: You can define the Task title as the particular outcome you are targeting.
- More detail: You can use this option to open the detailed Sub-goal filling form.
- Due date: By default the selected Time Frame End date will be selected. However you have an option to customize the exact dates for when your Task ends.
- Progress: By default Not Started will be selected as the progress state. However you can select & change from the three progress type Not Started, In Progress and Closed. - Once you have entered the necessary details, you click on Save icon to publish the Task.
What is Average progress graph?
The Average Progress Graph is a feature in our goal management software that visually represents the average progress of all listed goals within a specific timeframe, such as a quarter.
This graph is a time series chart, meaning it shows how the average progress of goals changes over time. On the X-axis, you will find the dates, which represent the selected timeframe divided into intervals. On the Y-axis, you will see the progress interval ranging from 0 to 100, indicating the percentage of goal completion.
For example, if you've set multiple goals for a quarter, it will calculate the average progress of these goals at regular intervals during this quarter. These calculated values are then plotted on the graph. This allows you to easily visualize and track how your goal progress is evolving over time.
What is my My progress updates?

The My Progress Updates is a feature in our goal management software that provides a visual representation of your goal or sub-goal progress on specific dates.
This feature uses a time-series chart to track and display your progress updates. On the X-axis, you will find the date intervals corresponding to the duration of your goals or sub-goals. The Y-axis represents the percentage of goal progress achieved.
For instance, if you're tracking a goal over a quarter, it will plot the progress percentage for each specific date within that quarter on the chart. This allows you to easily visualize and track your goal's progression over time.
Important notes:
- Goal/Sub-goal this will vary based on the goal terminology confirmed in the setting. As we allow organisations to choose the terminology that is being followed.
Automatic status update on goals & sub goals based on progress
- On Track: When your progress aligns with the expected timeline or target, the status will be marked as "On Track." This status reflects your steady progress and adherence to the planned schedule.
- Needs Attention: If your progress falls behind the expected timeline or target, the status will be updated to "Needs Attention." This feature helps you identify areas that require extra effort to get back on track.
- At Risk: The "At Risk" status indicates that the progress towards achieving the goal is facing potential challenges or is in jeopardy. This status helps you recognize and address risks proactively.
Automated Status Updates:
Whether you manually update progress or use integrations (such as JIRA or Google Sheets), the status will be updated automatically. This seamless integration ensures that your status is always up-to-date, saving you time and effort in managing your goals.

You can now view the information on how the status is being updated by clicking on "How it works?" next to the status field. This will provide you with insights into the criteria used to determine the status based on your progress.
![]()
While the status is dynamically updated, you can still change it manually if needed. We want you to have complete control over the status representation, empowering you to reflect any adjustments or contextual changes accurately.
Hope this was helpful in understanding how to Create a new Goal, Sub-goal & Task. More questions? Get in touch with our product experts and we will be happy to help!
Related Links:
Was this article helpful?
That’s Great!
Thank you for your feedback
Sorry! We couldn't be helpful
Thank you for your feedback
Feedback sent
We appreciate your effort and will try to fix the article